tl;dr AzureEventGridSimulator lets you run Azure Event Grid locally so you can develop and test event-driven code without an Azure subscription. This post walks through installing it, wiring up a local Azure Function, publishing events, filtering them, and using the dashboard to see what’s going on.
I created this article, but it has been reviewed and refined with help from AI tools: Claude and Grammarly.
Back in 2018, I wrote about the hoops you had to jump through to locally debug an Event Grid triggered Azure Function. It involved Postman, a magic request header, and a fair bit of friction. Azure Event Grid still doesn’t have an official local emulator, so I built one. It’s now at v5 and supports CloudEvents, multiple subscriber types, event filtering, retry with dead-lettering, a built-in dashboard, and deployment via Docker or .NET Aspire.
This post is a hands-on walkthrough. By the end you’ll have events flowing from curl through the simulator into a local Azure Function, with filtering and the dashboard proving it all works.
What you’ll need
- .NET 10 SDK (or .NET 8 with minor adjustments)
- Azure Functions Core Tools v4 (
func) - curl, Postman, or similar for sending HTTP requests
You don’t need Docker for this walkthrough. We’ll use the dotnet tool installation, which is the simplest way to get up and running.
Installing the simulator
| |
Run it to confirm it installed:
| |
You should see it start up and complain about missing configuration - that’s fine, we’ll set that up next. Hit Ctrl+C to stop it for now.
The simulator can also run as a Docker container or via .NET Aspire.
Setting up an Azure Function
We need something to receive events. Let’s create a minimal Azure Function with an Event Grid trigger.
| |
Open the generated ProcessEvent.cs and update it to look like this:
| |
We’re using EventGridEvent here because we’ll be publishing events in Event Grid schema format, and the simulator delivers them to subscribers as-is. If you prefer CloudEvents, you can set "inputSchema": "CloudEventV1_0" on the topic and use the CloudEvent type from Azure.Messaging instead.
Before starting, open local.settings.json and update the storage setting. The template defaults to UseDevelopmentStorage=true which requires Azurite to be running. For this walkthrough we don’t need it:
| |
Start it:
| |
You should see it listening on http://localhost:7071. Leave this running in its own terminal.
Configuring the simulator
Create an appsettings.json in a separate directory where you’ll run the simulator:
| |
Each topic gets its own HTTPS port. The key works just like the real Event Grid - events must include it in an aeg-sas-key header. Setting disableValidation to true skips the subscription validation handshake so we don’t have to deal with that during local dev.
The subscriber types are keyed by kind: http, serviceBus, storageQueue, and eventHub. We’re using http here. The wiki covers the full configuration reference.
Publishing your first event
If you haven’t already trusted the .NET development certificate:
| |
Start the simulator from the directory containing your appsettings.json:
| |
Open another terminal and publish an event:
| |
Note: Events are sent as a JSON array, even for a single event. The
-kflag accepts the self-signed dev certificate.
Now check your terminals. In the simulator terminal you should see it log the received event and forward it. In the Azure Functions terminal you should see:
| |
That’s the basic flow working. Let’s make it more interesting.
Checking the dashboard
The simulator has a built-in dashboard that shows events and their delivery status in real time. It’s enabled by default. Open your browser and go to:
| |
You should see the event you just published, along with its delivery status to the ProcessEventFunction subscriber. Publish a few more events with different subjects or event types and watch them appear. This is the quickest way to see what’s happening without jumping between terminal windows.
Filtering events
In production, you’d use Event Grid filtering so subscribers only receive events they care about. Let’s try that. Stop the simulator and update appsettings.json to add a second subscriber with a filter:
| |
Restart the simulator and publish two events - one that matches the filter and one that doesn’t:
| |
| |
Now open the dashboard at https://localhost:60101/dashboard. You should see that:
- The AllEvents subscriber received both events
- The SignupsOnly subscriber only received the first event (the signup) and the order event was filtered out
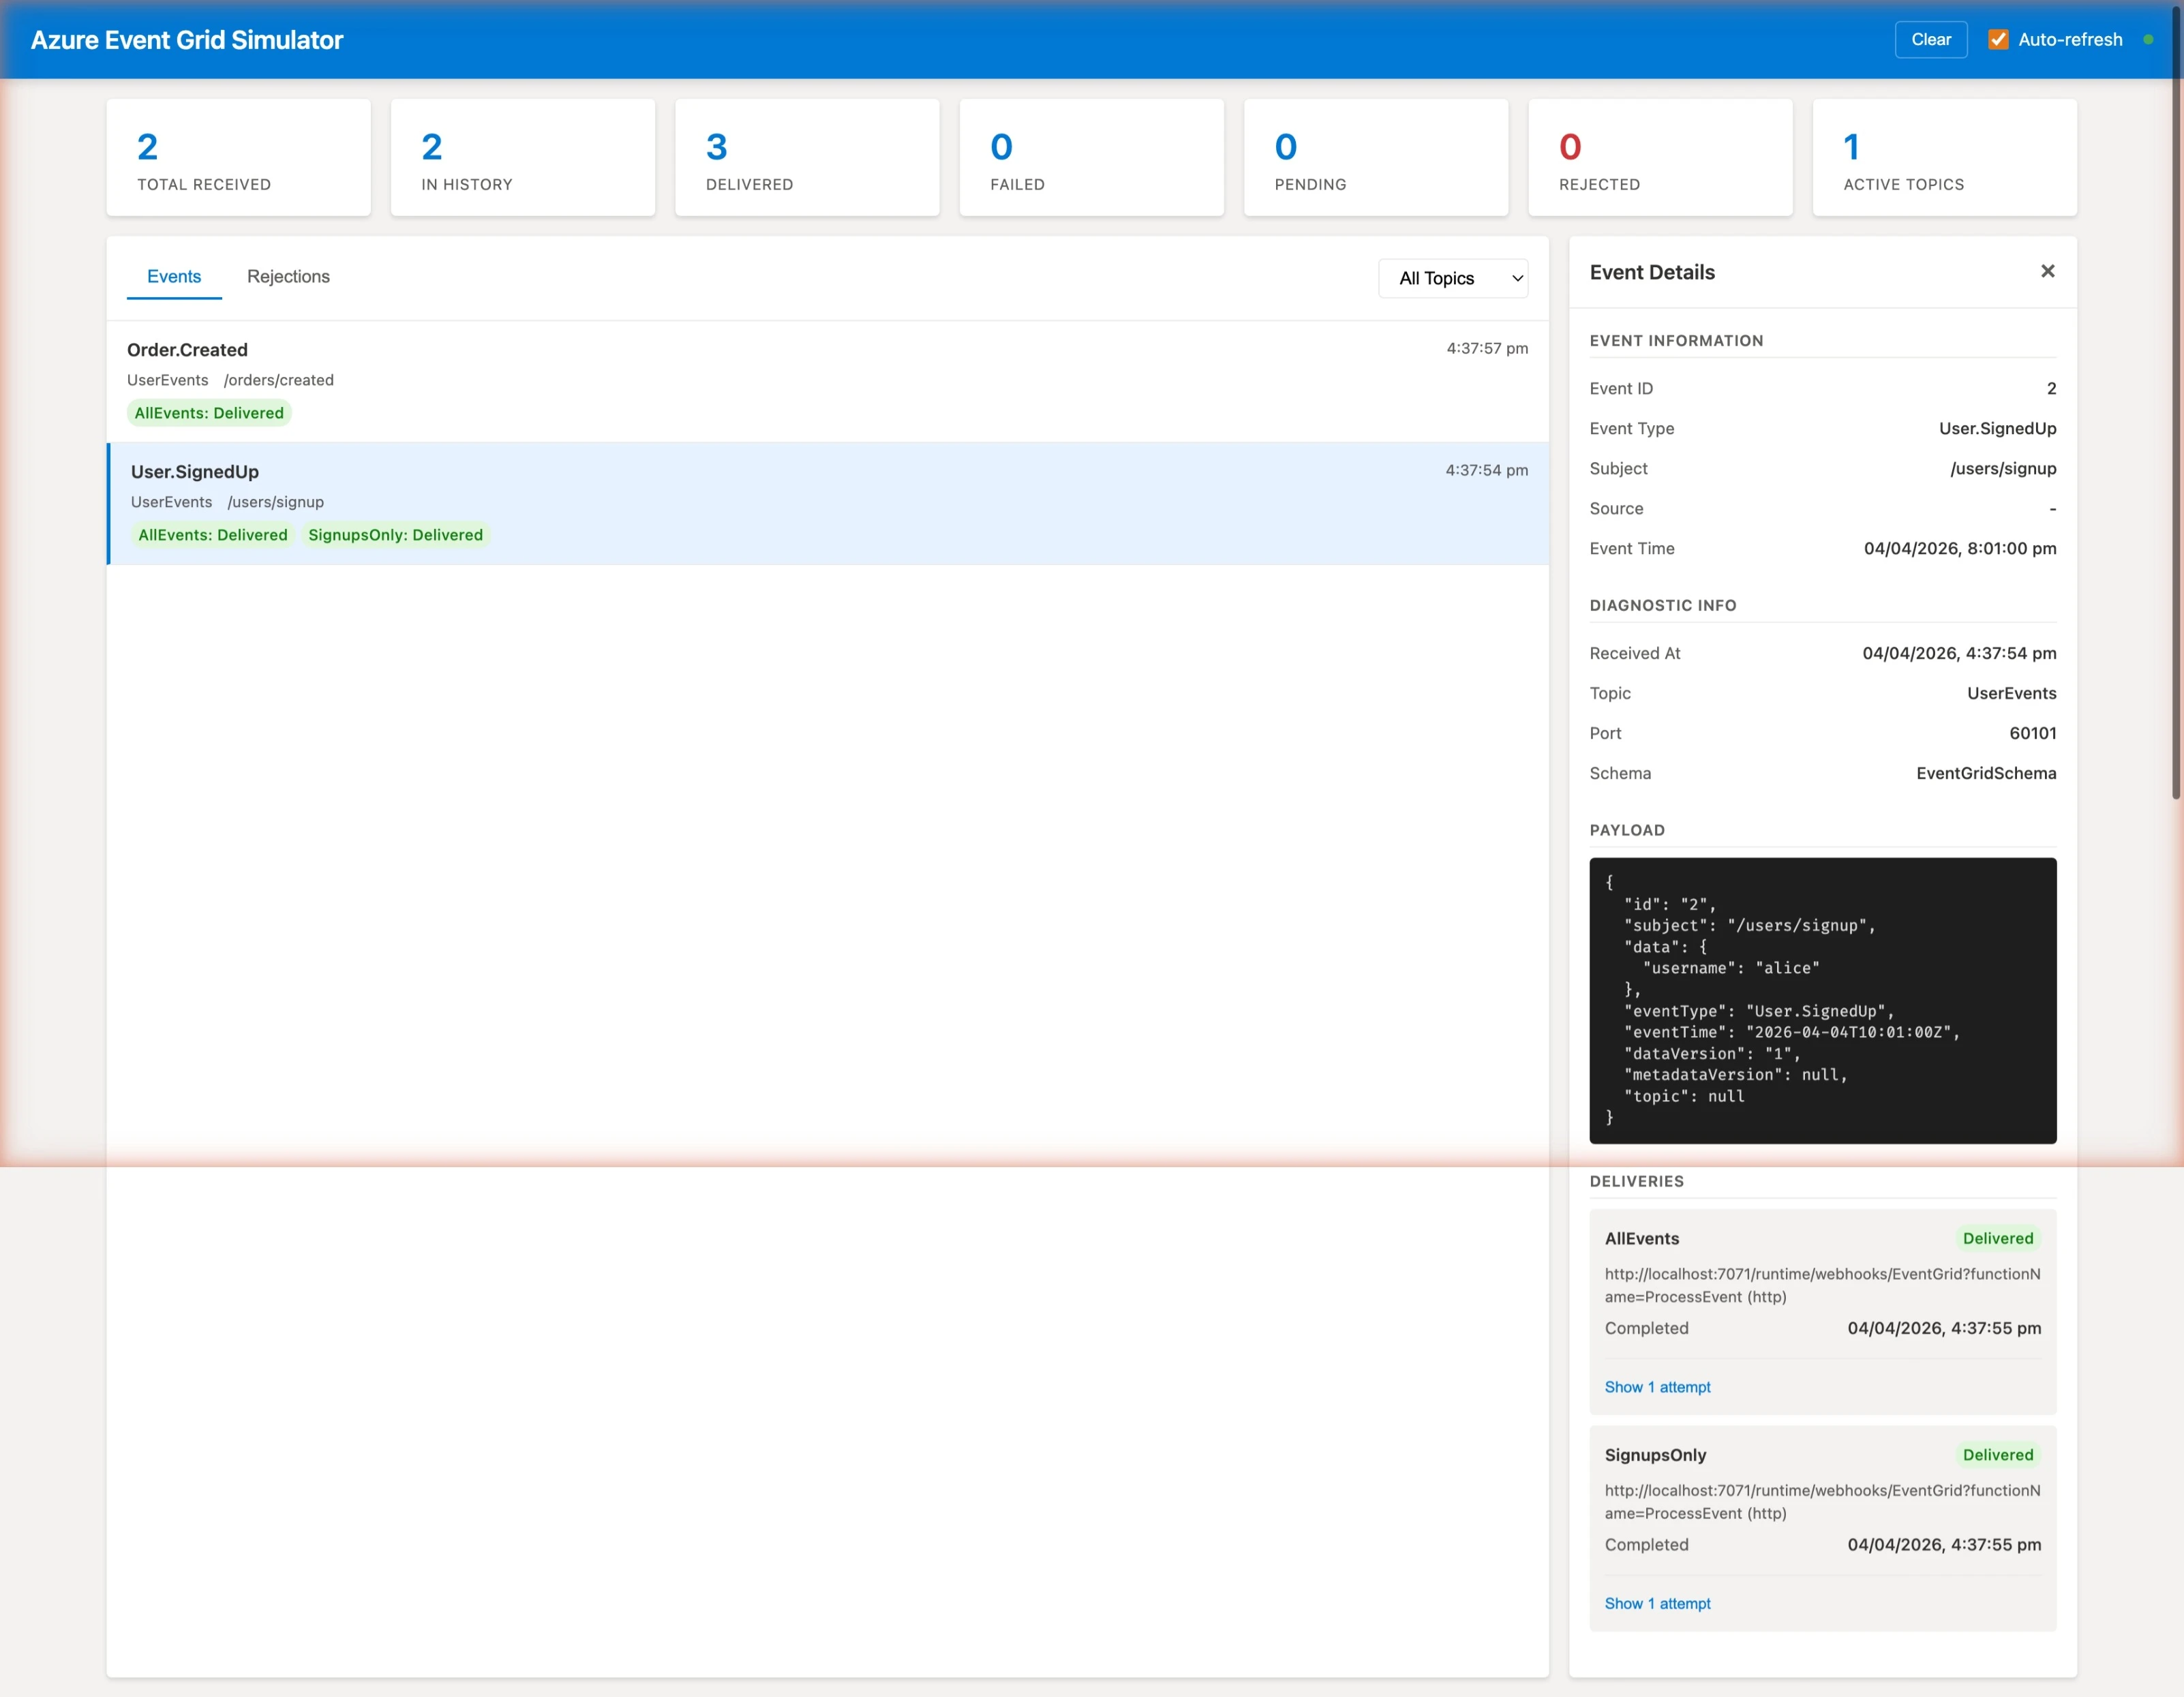
That’s basic filtering using event type and subject prefix. The simulator also supports advanced filtering with up to 25 expressions per subscriber - operators like NumberGreaterThan, StringContains, BoolEquals, and more, targeting any property in the event payload.
Retry and dead-lettering
What happens when a subscriber is down? Try it - stop your Azure Function, then publish another event. Check the dashboard and you’ll see the delivery status change to show retry attempts in progress.
Retry is enabled by default and follows Azure’s exponential backoff pattern - 10 seconds, 30 seconds, 1 minute, then progressively longer intervals up to 12 hours between attempts. If a subscriber returns a 400, 401, 403, or 413, the event is immediately dead-lettered with no retry.
You can configure retry and dead-lettering per subscriber:
| |
When an event exhausts its retries or exceeds its time-to-live, it’s written as a JSON file to the dead-letter folder. You can inspect the files to see exactly what failed. Start your Azure Function again and the queued events will be delivered on the next retry attempt.
The retry and dead-letter wiki page has the full retry schedule and HTTP status code handling details.
Publishing from .NET code
In a real project you’d publish events from your application code, not curl. The official Azure.Messaging.EventGrid NuGet package works against the simulator with no changes. Install it with:
| |
Then publish an event:
| |
This is the exact same EventGridPublisherClient you’d use against a real Event Grid topic. Swap the URI and key via configuration and your code works in both environments.
What else can it do?
This walkthrough covered HTTP webhook subscribers with the EventGrid schema, but there’s more to explore:
- CloudEvents v1.0 - set
"inputSchema": "CloudEventV1_0"on a topic to use CloudEvents instead - Service Bus subscribers - deliver events to queues or topics, works with the Service Bus emulator
- Storage Queue subscribers - pairs with Azurite for local development
- Event Hub subscribers - works with the Event Hubs emulator
- Docker Compose - run the simulator alongside Azurite, Service Bus, and Event Hubs emulators for a full local stack
- .NET Aspire - orchestrate the simulator with other services and get an observability dashboard
Wrapping Up
We went from nothing to a working local Event Grid setup - publishing events, receiving them in an Azure Function, proving that filters work using the dashboard, and seeing how retry and dead-lettering behave when a subscriber goes down. All without touching Azure.
The full documentation is on the GitHub wiki. If you run into any issues or have feature requests, raise an issue.
Thanks for reading.