
tl;dr This article breaks down Azure’s private networking concepts using an easy to understand office phone system analogy. It explains Private Links, Private Endpoints, Private DNS Zones, and Private DNS Zone Groups, their relationships, and why they’re important for enhanced security and performance.
I created this article, but it has been reviewed and refined with help from AI tools: Claude and Grammarly.
Introduction
Recently, I found myself revisiting Azure’s private networking concepts. You know how it goes - you learn something, don’t use it for a while, and then when you need it again, the details are a bit fuzzy.
This happens to me every. single. time I try and use Azure private networking again after a few months: Private Links, Private Endpoints, Private DNS Zones, and Private DNS Zone Groups 😵 How do they all interact again?!? 😕 What do I need all this stuff for again?!? 😖 This article is mostly a reminder to my future self about what all these things are and how they interact with each other.
Before we get into the details, let’s remind ourselves why we would even want to use these things in our Azure solutions:
Why Bother with VNets and Private Networking?
“Why go through all this trouble? Public endpoints are easier to set up, and private networking costs more.” It’s a fair question, and here’s why it’s often worth the effort:
Enhanced Security: Private networking significantly reduces your attack surface. By keeping your resources off the public internet, you make it much harder for malicious actors to reach them.
Compliance Requirements: Many industries have strict data protection regulations that require private, controlled access to resources.
Network Performance: Private connections can offer more consistent and sometimes better performance than routing through the public internet.
Simplified Firewall Rules: With private networking, you can implement more straightforward and secure firewall rules, as you’re dealing with known, private IP ranges.
Unified Network Architecture: VNets allow you to create a unified network architecture that spans your on-premises and cloud resources, enabling hybrid cloud scenarios. Ooh fancy!
There’s real cost and complexity here, but if your organisation deals with sensitive data or complex applications, the trade-off is usually worth it.
Now, let’s break down these networking concepts, starting with the official Azure definitions.
The Official Azure Terminology
Let’s review how Microsoft officially defines these networking components:
Azure Private Link: A service that enables you to access Azure PaaS Services (for example, Azure Storage and SQL Database) and Azure hosted customer-owned/partner services over a Private Endpoint in your virtual network. 😐
Private Endpoint: A network interface that connects you privately and securely to a service powered by Azure Private Link. It uses a private IP address from your VNet, effectively bringing the service into your VNet. 🤨
Private DNS Zone: An Azure DNS zone that provides name resolution within a virtual network and between virtual networks. It allows you to use your own custom domain names rather than the Azure-provided names. 😥
Private DNS Zone Group: A grouping of private DNS zones associated with a Private Endpoint. It enables the integration of Private Endpoints with Azure DNS private zones. 😶🌫️
While these definitions are technically accurate and mostly understandable, they can be a bit abstract. So I came up with an analogy that sticks in my head better.
The Office Phone System Analogy
Let’s imagine Azure’s private networking as an office phone system:
Private Link (📞): This is the telephone company’s private direct-line service - the offering that makes private lines possible in the first place. Without subscribing to this service, you’d have to make all your calls through the public phone network. Private Link is the capability that lets your office install dedicated, private phone lines to specific departments or partners. It’s not the phone or the line itself - it’s the service that provisions them.
Private Endpoint (🎧): This is a dedicated phone handset installed on your desk, hardwired to one specific department. It has its own extension number (a private IP address) within your office’s phone system (your VNet). You pick up this handset and you’re connected directly to, say, the finance department - no switchboard, no public lines, no chance of someone intercepting the call. Each handset connects to exactly one department, and you can have multiple handsets on your desk for different services.
Private DNS Zone (📘): This is the internal-only phone directory that maps department names to extension numbers. When you want to call “Finance”, you look them up in this directory and it tells you to dial extension 105 (the Private Endpoint’s IP address). Crucially, this directory is only visible inside your office building - no one outside can see it, and it always returns the private extension numbers rather than the public switchboard number.
Private DNS Zone Group (🔄): This is the auto-sync setting you attach to a handset. Configure it once when the handset is installed, and from then on that handset keeps its own entry in the directory current - if its extension changes, the directory follows. Note the scope: it’s one setting per handset, not a standing rule that catches every new phone in the building. Install a second handset and forget to switch its auto-sync on, and its extension never makes it into the phone book. Without it, you’d be updating the directory by hand every time a phone was added or moved.
In this analogy, your Azure Virtual Network is like the entire office building, with different floors or areas representing your subnets. The public internet is the world outside your office, and by using these private networking components, you’re creating a secure, invitation-only communication system within your organisation.
This setup keeps your “conversations” private and improves efficiency. You don’t have to go through a public switchboard (public internet) every time you need to connect to a service - you have direct, private lines at your disposal.
How a Request Actually Flows
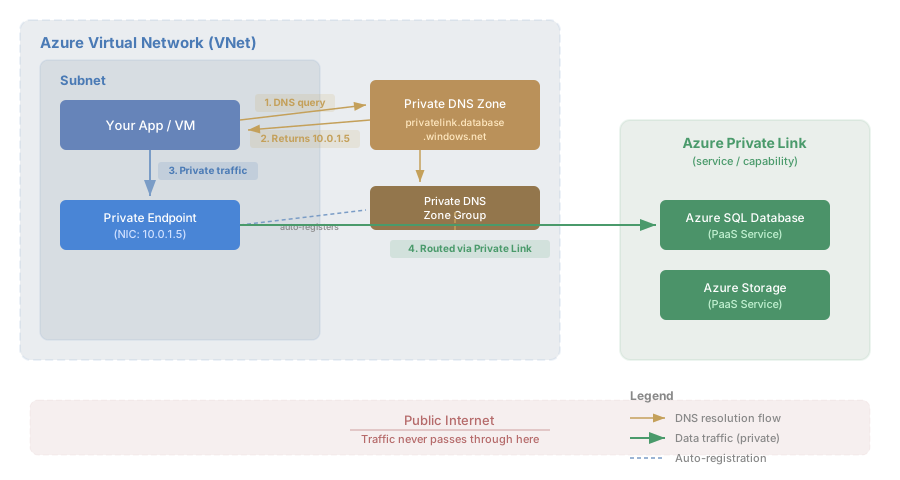
The analogy explains what each piece is, but it’s just as important to understand how they work together. Here’s what happens when your app connects to Azure SQL Database over private networking:
- Your app asks DNS: “Where is
mydb.database.windows.net?” - like looking up “Finance” in the phone directory. - Private DNS Zone responds: “That’s at
10.0.1.5” (the Private Endpoint’s IP address) - instead of returning a public IP, the internal-only directory gives you the private extension number. There’s a hop hidden in here worth knowing about: Azure publishes a public CNAME sendingmydb.database.windows.nettomydb.privatelink.database.windows.net, and it’s that second name your private zone answers. Which is why the zone you create is calledprivatelink.database.windows.net- with the prefix. Your connection string keeps using the originalmydb.database.windows.netthough; connecting to theprivatelinkname directly will fail. - Traffic flows through your VNet: Your app sends the request to
10.0.1.5, which is the Private Endpoint NIC sitting in your subnet - like picking up the dedicated handset on your desk. - Private Link routes the request: The Private Endpoint forwards the traffic through Azure’s backbone network directly to your SQL Database instance - the dedicated line connects you straight to the department, bypassing the public switchboard entirely.
The request never touches the public internet. No public IP is involved on this path. This is the whole point.
Two gotchas are worth calling out here, because both of them let you believe you’re private when you aren’t:
Gotcha 1 - DNS. Without the Private DNS Zone, your app would resolve
mydb.database.windows.netto the public IP address and try to reach it over the internet - even though you’ve set up private networking. This is the most common gotcha when configuring Private Endpoints.
Gotcha 2 - the public door stays open. Creating a Private Endpoint does not switch off the service’s public endpoint. Microsoft’s docs put it plainly: private endpoints “provide a privately accessible IP address for the Azure service, but don’t necessarily restrict public network access to it”. Your traffic now takes the private path, but anyone with the connection details can still knock on the front door. You need to set Public network access to disabled (or lock it down with the service firewall) on each resource. The Private Endpoint gives you a private road in; it doesn’t demolish the public one.
Key Relationships to Remember
The phone system analogy helps visualise the concepts, but there are a few key relationships to keep straight:
One-to-One: Each Private Endpoint connects to one Private Link service - and to one sub-resource of it. That second part catches people out: a storage account’s Blob and File services are separate sub-resources, so they need separate Private Endpoints. One handset per department, not one per building.
One-to-Many:
- A VNet can have multiple Private Endpoints.
- A Private DNS Zone can be linked to multiple VNets.
Type-Specific: There’s typically one Private DNS Zone per Azure service type (e.g., separate zones for Blob Storage and Azure SQL).
Grouping: Each Private Endpoint has one Private DNS Zone Group, which links it to the appropriate Private DNS Zone(s).
How It All Connects
This diagram shows how a request flows from your app through the private networking stack to the PaaS service, and how DNS resolution fits in:
Real-World Scenario
Imagine you’re building a secure web application with the following components:
- Web App (Azure App Service)
- Database (Azure SQL)
- File Storage (Azure Blob Storage)
- Secrets Management (Azure Key Vault)
Here’s how you might set it up:
- Create a VNet with three subnets: one delegated to the Web App for VNet integration, one for your Private Endpoints, and one for management. The first two have to be separate subnets - App Service won’t share.
- Enable regional VNet integration on the App Service. This is the step everyone misses, and it’s the one that makes or breaks the whole design. A Private Endpoint on your web app only handles traffic coming in to it. Your app’s outbound calls - the ones actually going to SQL, Storage and Key Vault - don’t go anywhere near your VNet until VNet integration is switched on. Miss this and you’ll have a beautiful set of Private Endpoints that your app never uses.
- Create Private Endpoints for SQL, Blob Storage, and Key Vault in the endpoint subnet. Add one for the Web App too if you want private inbound access to the app itself, say from on-premises or behind an Application Gateway.
- Create Private DNS Zones for each service type -
privatelink.database.windows.net,privatelink.blob.core.windows.net,privatelink.vaultcore.azure.net- and link each one to the VNet. - Attach a Private DNS Zone Group to every Private Endpoint, so the records get created and maintained for you.
- Set Public network access to disabled on each service. Otherwise the private path is just the preferred path, not the only one.
Do all six and communication between your app components and Azure services stays on the private network. Skip step 2 and your app still talks to its database over the public internet, no matter how many Private Endpoints you’ve built.
Conclusion
The office phone system analogy is what finally made these concepts stick for me. Private Link is the service, Private Endpoint is the access point, Private DNS Zone is the directory, and the Zone Group keeps the directory in sync. But let’s see if I remember all this in six months!
I hope this explanation helps you as much as it’s helped me. If you have other analogies, tips for understanding Azure concepts, or experiences with private networking, I’d love to hear about them in the comments below!
Thanks for reading.